Table of Contents
Spotify has a collection of over 80 million songs, making it one of the leading music streaming services. It also has a built-in equalizer that allows you to tweak settings and significantly improve the listening experience.
Upgrading to a pair of high-end headphones will be costly. Therefore, tweaking the Spotify equalizer settings might give you a similar experience. It would be more better if you have a stable internet connection.
Spotify equalizer is free to use, but it is only suggested to tweak it if you understand the basics. I am writing this tutorial to make it easier for you to understand the best equalizer settings for Spotify.
What Can the Spotify Equalizer Do?
Spotify equalizer lets you handle a range of frequencies that can be boosted or cut within the track. You can balance specific frequencies by increasing, lowering, or leaving them unchanged.
This customized control over the frequency ranges lets you change your music’s sound signature to better suit your taste. For instance, if your music sounds too “muddy,” you can use an equalizer to bring out the higher frequencies and create a brighter sound.
You can turn up the low frequencies for a richer, fuller sound if you want to add more bass to thumping dance tunes.
By isolating and modifying these specific frequency ranges, you can significantly change your music’s overall tone and enjoy a more personalized listening experience.
When you’re trying to enjoy your favourite music, the last thing you want is for the sound to be distorted. Unfortunately, this common problem can occur when using an equalizer. In most cases, the issue is due to the limitations of your playback device.
For example, suppose you’re using a budget-friendly pair of earbuds. You may end up with a muddy or distorted sound. If you’re experiencing this, adjusting the settings on your Spotify equalizer is essential to improve the sound quality.
Should I Use EQ on Spotify?
You are reading this, and it already means you’re a fan of Spotify. You’ll want to check out Spotify’s Equalizer, as it can make a significant difference.
It is suggested to use EQ settings on Spotify. You can access the Equalizer from the Settings menu, and once you’ve turned it on, you’ll be able to adjust the bands to suit your preferences.
You can also save your custom settings as presets, so you can quickly switch between them when required.
How to Find the Best Spotify Equalizer Settings?
There is no single universal EQ setting for all songs. It depends on other factors as well, like your headphone quality, music genre, custom preference, etc.
Some people prefer a lot of detail in their music, while others prefer a heavier bass. Similarly, different audio devices have different sound signatures, depending on how the manufacturer has fine-tuned them. The best way to find the correct settings is to experiment with the following EQ settings and see what sounds best to your ears.
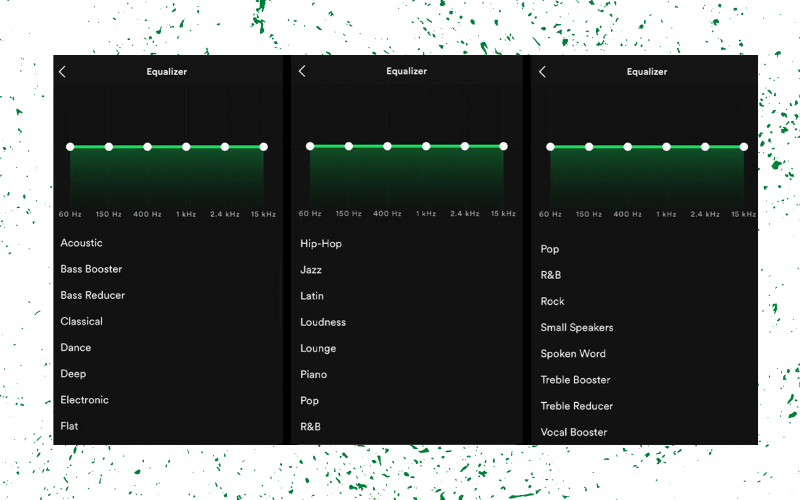
With Spotify’s built-in equalizer and custom presets, you can easily personalize your listening experience. There are preset settings that work well for most headphones.
Each setting may sound significantly different in a different genre, headphones, and other factors, so it may take some experimentation to get a perfect balance.
-
Acoustic Preset
Whether you listen to a soft acoustic love song (ballad) or an acoustic guitar tune, this preset should work well for you. Its slight boost on the low end and a gain on the 2.4kHz area ensure that your music sounds right with minimal noise.
-
Electronic Preset
This preset will make treble more visible, which allows for a much brighter and more musical sound than other presets. This setting can bring magical results and make vocal performances come alive with warmer and more defined tones.
-
Bass Booster Preset
The Bass booster preset within the Spotify app can give your low-frequency content more power in a balanced way that won’t clash with other frequencies.
It starts with a boost from the 60Hz to around 2.4kHz range that tapers off as the sound moves into higher frequencies. It allows for richer low-end without compromising the clarity and quality of other parts in your sound system.
However, you can tweak more settings in this preset to meet specific requirements. However, I suggest you raise the 150Hz and 400Hz areas.
-
Pop Preset
Pop preset is ideal for making vocals stand out in any music genre. I suggest boosting the low frequency around 60 Hz back to mid-level if you’re looking for a bass-heavy sound. This simple change will take your listening experience up a notch as you’ll be able to hear as much of the bass as the vocals, bringing that full and immersive sound that pop songs need.
-
Deep Preset
This preset gives you significantly lower treble than ‘dance’ and makes your punchy bass sound more substantial and more intense. If you’re listening to songs with a heavy bass line, Deep could make your ears vibrate from the thunderous lows. But best of all, this customizable setting lets you fine-tune the EQ to enjoy explosive audio that engulfs your senses truly.
-
Rock Preset
This preset will boost mid-frequencies to provide brilliant sound. With rock preset, guitar and percussion instruments might overpower the vocals.
-
Dance Preset
The dance preset in the Spotify app is designed to make music sound more engaging and dynamic. It dramatically boosts lower frequencies around 50Hz and 150Hz and amplifies mid-range frequencies between 400Hz and 2.4kHz. It enhances their listening experience and helps them get into the groove of dance music.
-
Small Speakers Preset
It’s easy to get frustrated when your phone needs help to produce decent sound quality with tiny earbud speakers. The ‘Small Speakers’ setting helps turn your phone’s tinny audio into something more substantial and well-rounded. It adds depth and richness to any tune by boosting lows. On most devices, reducing the mids within the area to around 400Hz and 1kHz also works well.
-
Boosting the Mids - Manual EQ Setting
To customize your listening experience to its best potential, tweaking the mids in your audio equalizer can be beneficial. Experimenting with levels in the 1kHz and 2.4kHz sliders can enable you to find your desired sound profile. Even slight adjustments to the 15 kHz slider may be beneficial, depending on your taste. This simple yet effective process will ensure far clearer listening no matter which podcast you choose.
-
Boosting the Lows and Highs - Manual EQ Setting
Boosting the lower and higher frequencies, instead of just focusing on the midrange, will create a unique setting that will work regardless of the genre of music. It could be the right EQ setting in Spotify when executed correctly.
You are suggested to avoid overdoing it, or it may ruin everything by producing unnatural sounds.
-
Tune It According To Your Headphone
Headphones do not generally give you a flat music response according to your taste. As a result, you should plug in headphones to your ears and try to set the frequency spectrum based on your personal choice.
Most headphones have a preset spectrum of frequencies that they boost and attenuate on their own, and hence if you are a true audiophile, you should tune the equalizer settings as per your taste by listening to a low-frequency song.
Other Useful Spotify Equalizer Settings
-
Audio Normalization
Audio normalization was developed to solve the issue of gain disparity among songs on Spotify. Typically, some tracks are quieter or significantly louder than others. Audio normalization brings all of the music tracks to the same level. It uses advanced algorithms, granting you a consistent and uniform soundscape regardless of how its original composer mastered it. With this feature activated, you can now enjoy all the music on Spotify without worrying about it being too loud or too quiet.
With only a few clicks of the gear icon, you can find it in your settings in both iOS and Android versions. For iOS, go to “Playback,” and under “Volume Level,” you will find it; for Android users, simply scroll down on the settings page until you encounter “Normalize Volume.” On both Windows and Mac OS devices, the audio normalization options are just a few clicks away on the ‘Settings page. Users are given three options: quiet, normal, and loud, each representing a different sound level.
-
Audio Quality Level
If you are aware of how to download songs on Spotify, then you may already know that Spotify allows you to independently choose the audio quality level depending on whether you use WiFi or mobile data. You can prefer a lower quality that will consume less data. It will save your mobile data from getting exhausted. Moreover, you can access different audio quality settings for downloaded content when scrolling down; this means you can customize your music experience even after downloading.
Adjusting the audio quality on your device only takes a few steps, regardless of the platform you are using. On iOS or Android devices, you must tap the gear icon on the upper right-hand corner of your screen and search for “Audio Quality” in the settings menu. You can now access all the settings related to this feature. If you’re on Windows or Mac OS, open the “Settings” page to find these options. Whether it’s your phone, laptop, or tablet, staying in control of your sound is as easy as one, two, or three.
-
Hardware Acceleration
If you often find your Spotify app lagging or draining your computer’s battery, you might consider activating its hardware acceleration. This feature is available only for Windows and Mac users. Still, it can significantly affect performance as it offloads many audio processing tasks from software to hardware. It is suggested to keep the hardware acceleration setting turned on by default.
-
Transition Settings
You can play with transition settings for smooth transitions between your favorite songs. It controls how the app should handle changes between tracks. You can set up your listening experience as buttery smooth as possible. Crossfading is a popular transition effect for switching between songs.
If you are on android or iOS, tap on the gear icon in the upper right-hand corner of your screen and then head over to “Playback” and “Crossfade.” For those with a Windows or Mac OS device, click on “Settings,” then select “Playback,” followed by “Crossfade Songs,” and you’ll be good to go!
How to Use The Equalizer in Spotify?
The built-in equalizer in Spotify help balances the frequencies in your music so you can hear all the details.
Depending on your device, different ways to access Spotify’s equalizer may exist. Here’s how you can access the Spotify Equalizer settings for Android and iOS.
-
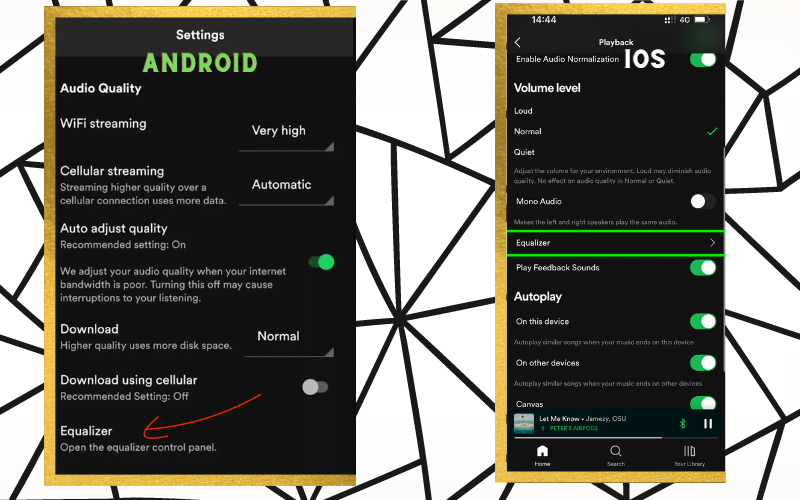
Android
On your android smartphone, open the Spotify app and tap on the “Home” tab. Then, tap on the “Settings” cog in the top-right corner. From here, scroll down and tap on “Playback.” Next, select “Equalizer.”
You should now see a list of preset options, as well as a custom option that you can use to create your sound profile.
-
iOS (iPhone or iPad)
On your iPhone, open the Settings app and scroll down until you find “Music.” Tap on “Music” and then scroll down to “Spotify.” Tap on “Spotify” and then toggle on the “Equalizer” option.
You should now see the same list of preset and custom options that are available on Android devices. Spotify and Airpods are also sleeping companions for many users among the United States.
-
Windows
Unfortunately, EQ is currently missing from the desktop app for Spotify users on Windows.
While other platforms, such as macOS and Linux, have had an equalizer for some time, Windows users still wait for Spotify to add this much-needed feature.
However, you can use free third-party alternatives like Equalizer APO. There is also an equalizer chrome extension that you can use.
-
MacOS
While Spotify offers a great selection of music, Mac users are at a disadvantage regarding Spotify equalizer. Instead of being able to adjust the sound directly through the Spotify app, you have to use your mac equalizer.
It can be a hassle, especially if you’re trying to fine-tune the sound for your specific taste. You can use other third-party apps, like eqMac2, Audio Hijack, Boom 2, etc., as alternatives on your MacOS.
An Example Depicting What an EQ Setting on Spotify Should Look Like
How Can I Make Spotify Sound Better In My Car?
If you are using Spotify to play music in your car, you must cross-check a couple of things. The first one would be to turn off the data saver mode. This will enable Spotify to stream music at a higher bit rate per second.
Next, you should ensure the equalizer settings for the car stereo. This will enable you to adjust the frequencies that you like. For example, if you want high bass, your car stereo will have a frequency from 90 to 200 Hz. However, if you like enhanced treble, your car stereo will play audio from 8000 to 15000 Hz.
Conclusion
By adding an equalizer feature, Spotify allows you to play around and customize the sound of your favorite music. In addition, the built-in genre presets in Spotify that can be applied with one tap makes it easier for beginners. For those unsure of how to use an equalizer, this is a great way to try out different sounds until you find one you like.
If you regularly listen to music on Spotify. In that case, I hope this article will help you to tweak EQ settings on the app, and I am sure you will notice a significant difference.